Python Toolbox
This post was completed with the assistance of ChatGPT-4.
Inheritance
Inheritance allows a class (known as a child class) to inherit attributes and methods from another class (known as a parent class). This leads to code reusability and a hierarchical organization of classes.
1
2
3
4
5
6
7
8
9
10
11
12
13
14
class Animal:  # Parent class
    def __init__(self, name):
        self.name = name

    def speak(self):
        pass

class Dog(Animal):  # Child class inheriting from Animal
    def speak(self):
        return "Woof!"

class Cat(Animal):  # Another child class inheriting from Animal
    def speak(self):
        return "Meow!"
Here, Animal is the parent class, and Dog and Cat are child classes that inherit from Animal. The method speak is overridden in each child class.
Abstract Base Class
An Abstract Base Class (ABC) in programming, particularly in object-oriented programming languages like Python, is a class that cannot be instantiated on its own and is designed to serve as a base class for other classes. The primary purpose of an ABC is to provide a common interface and set of behaviors that can be shared by multiple subclasses.
In Python, abstract base classes can be created using the abc module. Here’s a simple example:
1
2
3
4
5
6
7
8
9
10
from abc import ABC, abstractmethod

class Shape(ABC):
    @abstractmethod
    def area(self):
        pass

    @abstractmethod
    def perimeter(self):
        pass
In this example, Shape is an abstract base class with two abstract methods: area and perimeter. Any subclass of Shape must implement these methods to be instantiated.
Using ABCs helps in developing a more organized and modular codebase, making it easier to maintain and extend. It also helps in catching errors early in the development process, as trying to instantiate an abstract class or failing to implement an abstract method will result in an error.
If I want to write an interface, isn’t it enough to just normally inherit from object?
Inheriting from the object class and using an Abstract Base Class (ABC) in Python have significant differences, especially when you want to define an interface. Here’s an explanation of the differences and the advantages of ABCs:
- Enforcing Implementation of Interface Methods:
- Classes inheriting from
objectdo not enforce the implementation of any methods in subclasses. This means that if you forget to implement a method, your code might encounter runtime errors. - Classes inheriting from an ABC can define abstract methods (using the
@abstractmethoddecorator). This forces any subclass to implement these methods; otherwise, they cannot be instantiated. This helps prevent runtime errors and ensures all subclasses follow the same interface.
- Classes inheriting from
- Clear Design Intent:
- Using an ABC clearly indicates that the class is intended to be an interface. It shows that the class defines a set of APIs that should be implemented by other classes, rather than providing concrete functional implementations.
- In contrast, a class inheriting from
objectcould be a regular class or one intended as an interface, which is not as distinctly clear.
- Better Organization and Modularization:
- ABCs help better organize code, especially in large projects. By defining a clear interface, you can ensure all classes implementing this interface follow the same structure.
- This aids in maintaining and extending the code, as you can rely on these defined interfaces rather than specific class implementations.
- Early Error Detection:
- With ABCs, if a subclass does not implement all the abstract methods, Python will throw a TypeError when attempting to instantiate that class. This helps in detecting issues early in the development process rather than at runtime.
In summary, when you want to define an interface that should be implemented by other classes, using an ABC rather than plain object inheritance is a better choice. It provides strong support for ensuring interface consistency, clarity, and maintainability of the code. However, if you just need a regular base class without the need to enforce specific interfaces, then inheriting from object might be sufficient.
Inheritance Visualization
1
pip install pylint
1
2
3
4
5
6
7
8
9
# classes.py

class Animal:
    def __init__(self, name):
        self.name = name

class Dog(Animal):
    def bark(self):
        return "Woof!"
1
pyreverse -o png -p outputed_diagram classes.py
Here, -o png specifies the output format (PNG in this case), and -p outputed_diagram is the name of the project (used for labeling the diagram).
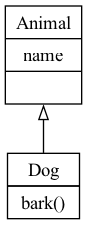 classes_outputed_diagram.png
Polymorphism
Polymorphism in OOP refers to the ability of different classes to be treated as instances of the same class through inheritance. It allows methods to be used in a similar way for different classes.
Using the previous classes, polymorphism is demonstrated as follows:
1
2
3
4
5
6
7
8
def animal_sound(animal):
    print(animal.speak())

dog = Dog("Buddy")
cat = Cat("Whiskers")

animal_sound(dog)  # Outputs: Woof!
animal_sound(cat)  # Outputs: Meow!
In this example, animal_sound is a polymorphic function that can take any object that has a speak method. Both Dog and Cat objects can be used here due to polymorphism.
Decorator
In Python, a decorator is a design pattern that allows you to modify the behavior of a function or a class method. It’s used to “decorate” or “wrap” a function with another function. Essentially, it allows you to add new functionality to an existing function without changing its structure.
Here’s a basic overview of how decorators work:
Definition: A decorator is typically defined as a function that takes another function as an argument and extends its behavior without explicitly modifying it.
Application: You apply a decorator to a function by prefixing the function definition with the decorator’s name and the
@symbol.Execution: When the decorated function is called, it’s passed to the decorator as an argument. The decorator can then execute some code before or after the original function is called, or modify the arguments or return value.
Here’s a simple example:
1
2
3
4
5
6
7
8
9
10
11
12
def my_decorator(func):
    def wrapper():
        print("Something is happening before the function is called.")
        func()
        print("Something is happening after the function is called.")
    return wrapper

@my_decorator
def say_hello():
    print("Hello!")

say_hello()
1
2
3
Something is happening before the function is called.
Hello!
Something is happening after the function is called.
In this example, my_decorator is a decorator that wraps around the say_hello function. When say_hello() is called, it first prints a message, then executes say_hello, and then prints another message.
Decorators are a powerful feature in Python, commonly used for logging, enforcing access control, instrumentation, and more. They make it easy to modify or extend the behavior of functions in a reusable and readable way.
@abstractmethod
- Usage: This decorator comes from the
abcmodule (abcstands for Abstract Base Classes). It is used to define abstract methods within an abstract base class. - Purpose: When you define a method as an abstract method, it means that the method must be implemented by any non-abstract subclass of the base class. This is useful when you have a base class that defines a common interface or protocol for a set of subclasses.
- Example:
1
2
3
4
5
6
7
  from abc import ABC, abstractmethod

  class AbstractClass(ABC):

      @abstractmethod
      def my_abstract_method(self):
          pass
- In this example, any subclass of
AbstractClassmust implementmy_abstract_method, otherwise, an instance of the subclass cannot be created.
@staticmethod
- Usage: This decorator is used to define a method that does not access instance or class data.
- Purpose: Static methods are used when some processing is related to the class, but does not require the class or its instances to perform any task.
- Example:
1
2
3
4
5
class MyClass:

    @staticmethod
    def my_static_method():
        print("This is a static method.")
my_static_methodcan be called on a class itself, or on an instance of the class, but it does not automatically receive the class (cls) or instance (self) as its first argument.
@classmethod
Usage: The
@classmethoddecorator is used to define a method within a class that is bound to the class and not the instance of the class. It takes the class itself as the first argument, typically namedcls, rather than a specific instance of the class (self).- Purpose:
- It’s often used for factory methods, which are methods that return an instance of the class, but might not use the same arguments as the class’s constructor.
- It can also be used for methods that need to operate on class-level data or perform operations relevant to the class as a whole, not just to instances.
- Example:
1
2
3
4
5
6
  class MyClass:
      @classmethod
      def from_string(cls, date_as_string):
          return cls(*map(int, date_as_string.split('-')))

  # MyClass.from_string("2021-12-31") would create an instance of MyClass using the provided string.
@property
Usage: The
@propertydecorator is used to define methods in a class that behave like read-only attributes. This allows class attributes to be accessed and modified in a controlled way without directly exposing the underlying data storage mechanism.- Purpose:
- It is used to implement getter methods, which return the value of a private attribute without exposing it.
- Combined with setter and deleter methods, it can control how an attribute’s value is set and deleted, often including some sort of validation or transformation.
- Example:
1
2
3
4
5
6
7
8
9
10
11
12
13
14
15
16
17
  class MyClass:
      def __init__(self):
          self._my_attribute = None

      @property
      def my_attribute(self):
          return self._my_attribute

      @my_attribute.setter
      def my_attribute(self, value):
          self._my_attribute = value

      @my_attribute.deleter
      def my_attribute(self):
          del self._my_attribute

  # This allows you to use my_instance.my_attribute to get the value, set it, or delete it, while keeping the actual data storage encapsulated.
In summary, @classmethod is used for methods that need to interact with class-level data or provide alternate ways to create class instances, while @property is used to manage the access to an instance’s attributes in a controlled manner, allowing for data encapsulation, validation, and potentially complex attribute access logic.
Python Launch
An Import Error
MyProject:
1
2
3
4
5
6
7
MyProject/
├── A/
│   └── module_a.py
├── B/
│   └── module_b.py
├── C/
│   └── module_c.py
MyProject/A/module_a.py:
1
from B.module_b import b_function
Run MyProject/A/module_a.py in directory MyProject:
1
ModuleNotFoundError: No module named 'B'
Run MyProject/A/module_a.py in directory MyProject/A:
1
ModuleNotFoundError: No module named 'B'
Launch File
- Click
Run and Debugbutton on the left sidebar. - Click
create a launch.json filebutton.- Choose
Python Debugger. - Choose
Python File.
- Choose
- Edit
launch.json
1
2
3
4
5
6
7
8
9
10
11
12
13
{
    "version": "0.2.0",
    "configurations": [
        {
            "name": "Python Debugger: Current File (Dynamic CWD)",
            "type": "debugpy",
            "request": "launch",
            "program": "${file}",
            "console": "integratedTerminal",
            "cwd": "${fileDirname}"
        }
    ]
}
Debugging MyProject/A/module_a.py using this launch.json file equivalent to running MyProject/A/module_a.py in directory MyProject/A.
My Import Style
MyProject:
1
2
3
4
5
6
7
8
MyProject/
├── A/
│   ├── module_a.py
│   └── Util_import.py
├── B/
│   └── module_b.py
├── C/
│   └── module_c.py
MyProject/A/Util_import.py:
1
2
3
import sys
import os
sys.path.append(os.path.abspath(os.path.join(os.path.dirname(__file__), '..')))
MyProject/A/module_a.py:
1
2
import Util_import
from B.module_b import b_function
Running MyProject/A/module_a.py in directory MyProject/A works.
Debugging MyProject/A/module_a.py using this launch.json file works.
Tips Learned from Youtube
Interactive Mode
1
2
3
4
5
# example.py
def greet(name):
    return f"Hello, {name}!"

print(greet("World"))
1
2
3
4
$ python -i example.py
Hello, World!
>>> greet("Python")
'Hello, Python!'
Sorted
The sorted() built-in function in Python is used to sort iterable objects, such as lists, tuples, and dictionaries, and returns a new sorted list without altering the original iterable object.
No need of import.
1
sorted(iterable, *, key=None, reverse=False)
iterable: The iterable object to be sorted.key: A function that takes one argument and returns a key to be used for sorting purposes.reverse: A boolean value. If set toTrue, then the list elements are sorted as if each comparison were reversed. The default isFalse, which means the list is sorted in ascending order.
Simple Sorting
1
2
3
nums = [3, 1, 4, 1, 5, 9, 2]
sorted_nums = sorted(nums)
print(sorted_nums)  # Output: [1, 1, 2, 3, 4, 5, 9]
Sorting Strings
1
2
3
words = ['banana', 'apple', 'cherry']
sorted_words = sorted(words)
print(sorted_words)  # Output: ['apple', 'banana', 'cherry']
Descending Order
1
2
3
nums = [3, 1, 4, 1, 5, 9, 2]
sorted_nums_desc = sorted(nums, reverse=True)
print(sorted_nums_desc)  # Output: [9, 5, 4, 3, 2, 1, 1]
Using the key Parameter
1
2
3
4
# Sort by string length
words = ['banana', 'apple', 'cherry']
sorted_words_by_length = sorted(words, key=len)
print(sorted_words_by_length)  # Output: ['apple', 'banana', 'cherry']
1
2
3
4
# Sort based on a value in a dictionary
data = [{'name': 'John', 'age': 45}, {'name': 'Diana', 'age': 35}, {'name': 'Mike', 'age': 25}]
sorted_data = sorted(data, key=lambda x: x['age'])
print(sorted_data)  # Output: list sorted by the 'age' key in ascending order
Print Tricks
Separator
1
2
3
4
5
6
import os

def print_separator(separator="="):
    size = os.get_terminal_size()
    width = size.columns
    print(separator * width)
Print Clear
1
2
3
4
5
6
7
8
9
10
11
12
import sys
import time

def overwrite_stdout(lines=1):
    sys.stdout.write(f"\033[{lines}A")  # 向上移动光标`lines`行
    sys.stdout.write("\033[K")  # 清除光标所在行

for i in range(10):
    print(f"i: {i}")
    time.sleep(1)
    if i < 9:  # 防止最后一次迭代也清除
        overwrite_stdout()
1
2
3
4
5
6
import time

for i in range(10):
    print("\033c", end="")  # 清除屏幕
    print(f"i: {i}")  # 打印新内容
    time.sleep(1)
Progress Bar
1
2
3
4
5
6
7
8
9
10
11
12
import sys
def overwrite_stdout(lines=1):
    sys.stdout.write(f"\033[{lines}A")  # 向上移动光标`lines`行
    sys.stdout.write("\033[K")  # 清除光标所在行

if __name__ == "__main__":
    import time
    for i in range(10):
        print(f"i: {i}")
        time.sleep(1)
        if i < 9:  # 防止最后一次迭代也清除
            overwrite_stdout()
1
2
3
4
5
6
7
# 打印消息而不干扰进度条;之前打印的消息不会被清除
from tqdm import tqdm
import time

for i in tqdm(range(10)):
    time.sleep(0.1)
    tqdm.write(f"当前迭代:{i}")
Running Time
time
1
2
3
4
5
6
7
8
9
10
11
import time

def some_function():
    time.sleep(1)

start_time = time.time()
some_function()
end_time = time.time()

elapsed_time = end_time - start_time
print(f"函数运行耗时:{elapsed_time}秒")
Python Profile
- Used to find performance bottlenecks.
- Can be easily done by clicking the button in the upper right corner, if you are using
PyCharm (Professional Edition).
Check this website.
Package Release
Official Guide: Packaging Python Projects
Quick Guide
把自己的代码变成可以通过终端安装的库,主要涉及以下几个步骤:
整理代码结构:首先,需要将你的代码组织成一个清晰的结构。通常情况下,一个Python库的目录结构大致如下:
1
2
3
4
5
6
7
8
your_package_name/
├─ your_package_name/
│  ├─ __init__.py
│  ├─ module1.py
│  └─ module2.py
├─ tests/
├─ setup.py
└─ README.md
其中,
your_package_name/文件夹内部包含了你的库文件,__init__.py文件标识这个文件夹是一个Python包。setup.py是安装、分发、打包你的库的脚本。编写
setup.py文件:setup.py是一个非常关键的文件,它包含了关于你的包的元数据和安装依赖等信息。一个基本的setup.py文件看起来像这样:1 2 3 4 5 6 7 8 9 10 11
from setuptools import setup, find_packages setup( name="your_package_name", version="0.1", packages=find_packages(), install_requires=[ # 你的包依赖的其他包 ], # 其他元数据 )
打包:在你的包的根目录下运行以下命令,这会生成一个分发包,通常是
.whl文件和/或一个.tar.gz文件。确保你已经安装了wheel包(pip install wheel)。1
python setup.py sdist bdist_wheel
本地测试:
pip install dist/xxx.whl发布到PyPI:首先需要在PyPI注册一个账号,然后安装
twine(pip install twine),最后使用以下命令上传你的包:1
twine upload dist/*
安装测试:一旦你的包被成功上传到PyPI,你就可以使用
pip来安装它了,就像安装其他任何包一样:1
pip install your_package_name
这就是将代码变成可通过终端安装的库的基本步骤。建议在打包和发布前仔细阅读Python官方文档关于打包和发布项目的指南,以确保遵循最佳实践。
编写setup.py文件
在Python中,setup.py是一个构建和分发Python包的脚本。它描述了你的项目的元数据,比如包的名称、版本、作者等信息,以及如何安装和打包的指令。这里提供一个更详细的setup.py示例:
1
2
3
4
5
6
7
8
9
10
11
12
13
14
15
16
17
18
19
20
21
22
from setuptools import setup, find_packages

setup(
    name                          = "LyPythonToolbox",                              # 包名
    version                       = "0.1.2",                                        # 版本号
    author                        = "Yue Lin",                                      # 作者名字
    author_email                  = "linyue3h1@gmail.com",                          # 作者邮箱
    description                   = "Ly's personal python toolbox.",                # 简短描述
    long_description              = open("README.md").read(),                       # 长描述,通常是README文件
    long_description_content_type = "text/markdown",                                # 长描述内容的格式,这里为Markdown
    url                           = "https://github.com/YueLin301/LyPythonToolbox", # 项目的URL,通常是GitHub的URL
    packages                      = find_packages(where='src'),
    package_dir                   = {'': 'src'},
    install_requires              = [
        # 'torch>=1.7.1',  # 表示安装torch时,版本需要1.7.1或更高
    ],
    classifiers=[
        "Programming Language :: Python :: 3",  # 3.x
        "License :: OSI Approved :: MIT License",
        "Operating System :: OS Independent",  # suitable for any OS.
    ],
)
打包命令
打包命令主要有两个步骤,首先是生成分发包,其次是生成wheel包。
生成分发包 (
sdist):这一步会创建一个源代码包,通常是一个.tar.gz文件。使用以下命令:1
python setup.py sdist
生成wheel包 (
bdist_wheel):wheel是Python的二进制包格式,相比源代码包,它安装速度更快。在运行此命令之前,确保你已经安装了wheel包。如果没有安装,可以通过pip install wheel进行安装。生成wheel包的命令如下:1
python setup.py bdist_wheel
wheel是Python的一个包格式,是一种用于Python包分发的二进制包格式,扩展名为.whl。它的目的是替代旧的.egg格式,解决一些存在的问题,并提高包的安装速度。通过使用wheel格式,可以使得Python包的安装更加快速、高效。
编写和使用
如果你的项目LyPythonToolbox中有两个模块文件,并且每个模块文件中都包含一个函数,你可以按照下面的方式来组织和使用它们。假设你有两个模块文件,module1.py和module2.py,每个文件中都定义了一个函数。
项目结构调整:
1
2
3
4
5
6
7
8
LyPythonToolbox/
├── LyPythonToolbox/
│   ├── __init__.py
│   ├── module1.py
│   └── module2.py
├── tests/
├── setup.py
└── README.md
编写函数:
在
module1.py中:1 2 3 4
# LyPythonToolbox/LyPythonToolbox/module1.py def function1(): print("This is function1 from module1.")
在
module2.py中:1 2 3 4
# LyPythonToolbox/LyPythonToolbox/module2.py def function2(): print("This is function2 from module2.")
在
__init__.py中导入函数:为了使这些函数能够被包的用户轻松导入,你应该在
__init__.py文件中导入它们:1 2 3 4
# LyPythonToolbox/LyPythonToolbox/__init__.py from .module1 import function1 from .module2 import function2
这样做允许用户直接从你的包名导入这些函数,而不需要指定模块名。
按照前面讨论的步骤,使用wheel和twine打包并发布你的包到PyPI。
安装了LyPythonToolbox包之后,用户可以很容易地导入并使用这两个函数:
1
2
3
4
from LyPythonToolbox import function1, function2

function1()  # 打印: This is function1 from module1.
function2()  # 打印: This is function2 from module2.
这就是如何在你的Python包中包含多个模块和函数,以及如何使它们可以被包的用户导入和使用。通过这种方式,你可以组织复杂的包结构,使得功能模块化,便于管理和使用。